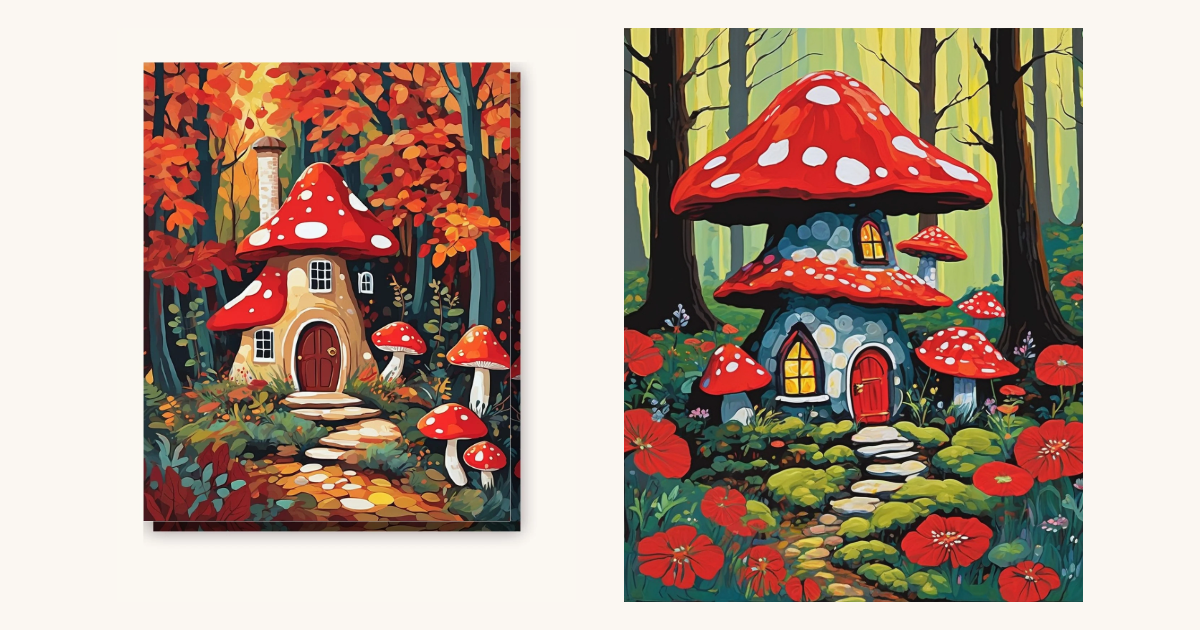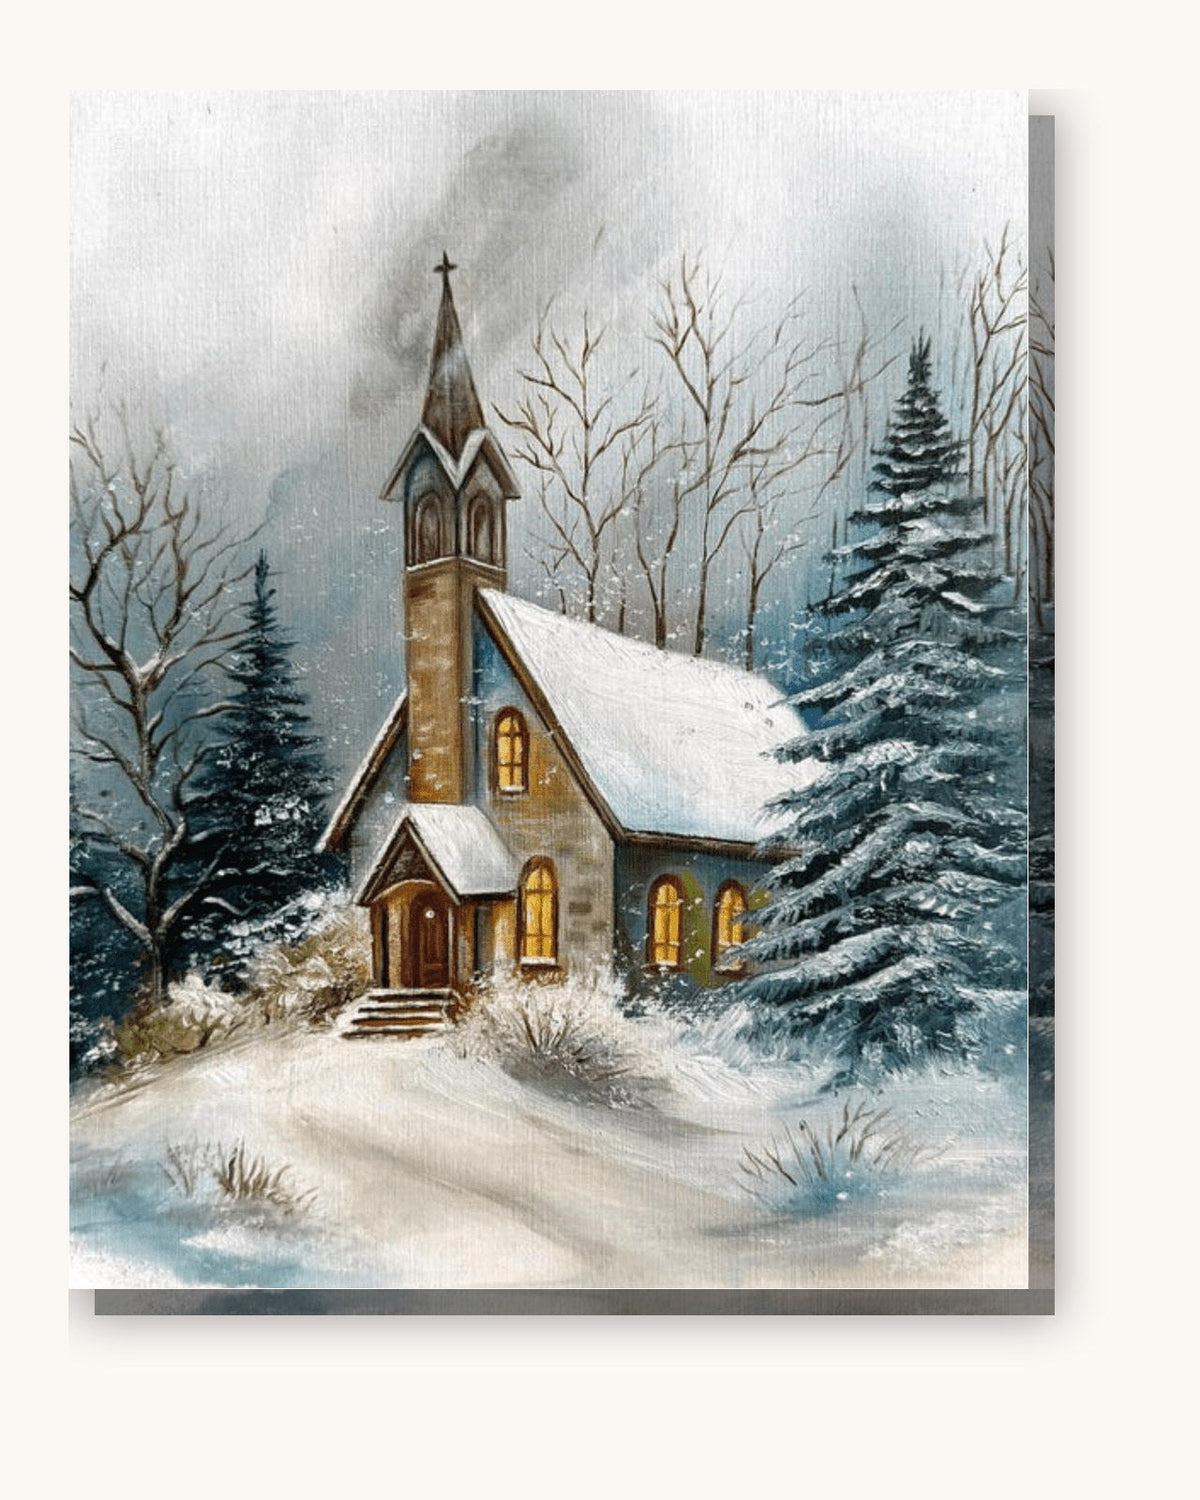
Choose Mushroom Cottage in the Autumn Forest if the orange canopy, pale chimney and little woodland doorway are what draw you in. Choose Fairy Mushroom House in the Forest if you prefer a larger red roof above blue-grey stone walls, bright windows and red flowers.
Both scenes have spotted mushroom caps and a path to the door. The difference is where your attention goes: through the autumn leaves toward a cottage, or straight to a stone house beneath an oversized cap. Start with the picture you would still want to paint after the roof is finished. The surrounding forest is part of the project too.
Compare the two compositions
| Detail to compare | Mushroom Cottage in the Autumn Forest | Fairy Mushroom House in the Forest |
|---|---|---|
| Main house | Ochre walls, arched dark-red door and a pale chimney | Blue-grey stone walls and a red door |
| Roof | Red spotted caps above the main house and its side section | Broad upper cap, lower red canopy and a small side cap |
| Windows | Dark panes with pale frames | Yellow-lit panes with dark frames |
| Forest | Orange and yellow leaves against dark teal trunks | Tall dark trunks against yellow-green light |
| Foreground | Fallen leaves, ferns, stepping stones and smaller mushrooms | Red flowers, green ground cover, stepping stones and mushrooms |
These comparisons come from the finished-design catalogue images. They describe the subjects and visible detail, not the exact number or size of the regions printed on a particular canvas option.
Mushroom Cottage: choose it for the autumn canopy

The Mushroom Cottage in the Autumn Forest kit gives the leaves a substantial role in the picture. Orange, red and yellow shapes fill the upper corners, with dark trunks interrupting the warm canopy. A pale chimney rises to the left of the main roof.
The house has a tall central section and a lower side section. Pale window frames and the outline around the arched doorway separate the building from the darker surroundings. The path steps forward through scattered leaves, while smaller mushrooms gather on the right.
This is the choice for someone who wants the cottage and the season together. The roof provides a clear landmark, but the forest carries much of the color. Before ordering, look closely at the leaves around the roof and the ground beside the steps. If you like those parts as much as the house, the composition makes sense for you.
Based on the artwork, expect to pay attention to the boundaries between warm foliage and cool dark trunks. That is a visual reading of the design, not a claim that we have counted or painted its numbered regions.
Fairy Mushroom House: choose it for stone, windows and flowers

The Fairy Mushroom House in the Forest kit brings the house closer to the viewer. Its upper cap stretches across much of the image, and the blue-grey wall contains rounded stone shapes. A lower red canopy runs across the building above the doorway.
The windows are a different focal detail here. Yellow panes sit inside dark outlines, so the light is something you paint within the architecture. The red door and pale stepping stones lead the eye down into the foreground.
Large red flowers frame the bottom of the scene. Behind the house, upright trunks stand against yellow-green woodland light rather than a dense orange canopy. There is still plenty around the building to paint, but the contrast between red caps, cool stone and bright windows gives this version its character.
Choose it if those contrasts are the reason you want a mushroom house. Do not choose it solely because the roof looks like one large red area: the finished illustration also contains changes of red, spots and a dark underside, and the actual numbered layout depends on the selected kit.
Think about the edges you enjoy painting
A roof, a window and a fern ask for different kinds of attention. The roof's outer curve is a long boundary. A window frame contains short lines and corners. The forest floor has repeated changes between leaf, stone and shadow.
Neither subject gives a reliable shortcut to “easy.” If you enjoy following architectural outlines, look at the doorways and windows. If you prefer moving between organic shapes, inspect the leaves and mushrooms. If repeated small details tire you, do not ignore the foreground just because the house is appealing.
For either scene, keep the supplied reference nearby and identify each region from its printed number. The number-reading guide is useful when several neighboring shades look similar in their pots. Guessing from the finished image is less dependable than following a readable label.
Choose the format before the frame
Both product menus currently include rectangular and square canvas sizes, plus 24, 36 and 48 color options. Treat those as format and palette choices rather than a universal difficulty scale. Fewer pots alone cannot tell you how small the shapes will be, how much foliage remains or how long you will want to spend painting.
A 40 x 50 cm rectangle and a 30 x 30 cm square have different proportions. Check how the composition is presented for the format you are considering, especially the outer leaves, roof and stepping stones. If the selected crop is unclear, establish it before ordering rather than assuming every format shows identical edges.
Measure the place where the finished picture will hang, and also the space where you will paint. You need room to support the whole canvas and place water and pots within reach. A larger format is a poor fit if half of it has to hang over your working surface.
The frame choices are canvas only or a DIY Frame Kit. The DIY option supplies wooden bars for you to assemble; it does not mean the canvas arrives already mounted on a frame. Choose with that assembly step in mind.
Give the first session a clear stopping place
Once your kit arrives, examine the actual numbered canvas before deciding where to begin. Choose a readable region with a boundary you can follow. A section of roof may work, but a small, clearly labelled part of the path is equally reasonable. You do not have to begin with the biggest feature.
Select a brush that fits inside the shape without forcing you to hold it at an awkward angle. Use the brushes supplied first; the brush guide explains how the tip's shape affects control. An extra detail set is optional.
Keep the distinction between a light window and its dark frame, or a white spot and the surrounding red, easy to see as you work. These contrasts help the finished house read clearly. There is no need to add blending or change the palette before you have seen how the supplied design comes together.
To make the final choice, return to the two images and cover the main roof with your hand. Pick the forest, walls and foreground you still want to paint. Then check that kit's size, color and frame options before adding it to your project list.